

This month's challenge was a Bakewell tart,,, what ??? never heard about it before, why not... let's go on and try it... I'll gain the knowledge a a new dish !!
The June Daring Bakers' challenge was hosted by Jasmine of Confessions of a Cardamom Addict and Annemarie of Ambrosia and Nectar. They chose a Traditional (UK) Bakewell Tart... er... pudding that was inspired by a rich baking history dating back to the 1800's in England.

 It turned out nice and easy.... very tasty, but I could not stop feeling guilty because of the amounts of butter in it, no problem once in a month not a big deal...;))))
 I made a white velvet cake with the egg whites
 I should not throw it anyway...I also had some of the dough's leftover so i made another tart .
 blueberry tart but did not taste it yet, I kept it in the freezer for another week !
 I did the same with the white velvet cake :)))
The June Daring Bakers' challenge was hosted by Jasmine of Confessions of a Cardamom Addict and Annemarie of Ambrosia and Nectar. They chose a Traditional (UK) Bakewell Tart... er... pudding that was inspired by a rich baking history dating back to the 1800's in England.
Before i forget, I have to put the recipe, so many people can enjoy it as much as I did !!
Bakewell Tart…er…pudding
Makes one 23cm (9” tart)Prep time: less than 10 minutes (plus time for the individual elements)Resting time: 15 minutesBaking time: 30 minutesEquipment needed: 23cm (9”) tart pan or pie tin (preferably with ridged edges), rolling pin
One quantity sweet shortcrust pastry (recipe follows)Bench flour250ml (1cup (8 US fl. oz)) jam or curd, warmed for spreadabilityOne quantity frangipane (recipe follows)One handful blanched, flaked almonds
Assembling the tartPlace the chilled dough disc on a lightly floured surface. If it's overly cold, you will need to let it become acclimatised for about 15 minutes before you roll it out. Flour the rolling pin and roll the pastry to 5mm (1/4”) thickness, by rolling in one direction only (start from the centre and roll away from you), and turning the disc a quarter turn after each roll. When the pastry is to the desired size and thickness, transfer it to the tart pan, press in and trim the excess dough. Patch any holes, fissures or tears with trimmed bits. Chill in the freezer for 15 minutes.
Preheat oven to 200C/400F.
Remove shell from freezer, spread as even a layer as you can of jam onto the pastry base. Top with frangipane, spreading to cover the entire surface of the tart. Smooth the top and pop into the oven for 30 minutes. Five minutes before the tart is done, the top will be poofy and brownish. Remove from oven and strew flaked almonds on top and return to the heat for the last five minutes of baking.
The finished tart will have a golden crust and the frangipane will be tanned, poofy and a bit spongy-looking. Remove from the oven and cool on the counter. Serve warm, with crème fraîche, whipped cream or custard sauce if you wish.
When you slice into the tart, the almond paste will be firm, but slightly squidgy and the crust should be crisp but not tough.
Jasmine’s notes:• If you cannot have nuts, you can try substituting Victoria sponge for the frangipane. It's a pretty popular popular cake, so you shouldn't have any troubles finding one in one of your cookbooks or through a Google search. That said, our dear Natalie at Gluten a Go Go has sourced some recipes and linked to them in the related alt.db thread.• You can use whichever jam you wish, but if you choose something with a lot of seeds, such as raspberry or blackberry, you should sieve them out.• The jam quantity can be anywhere from 60ml (1/4 cup) to 250ml (1cup), depending upon how “damp” and strongly flavoured your preserves are. I made it with the lesser quantity of home made strawberry jam, while Annemarie made it with the greater quantity of cherry jam; we both had fabulous results. If in doubt, just split the difference and spread 150ml (2/3cup) on the crust.Annemarie’s notes:• The excess shortcrust can be rolled out and cut into cookie-shapes (heck, it’s pretty darned close to a shortbread dough).
Sweet shortcrust pastry
Prep time: 15-20 minutesResting time: 30 minutes (minimum)Equipment needed: bowls, box grater, cling film
225g (8oz) all purpose flour30g (1oz) sugar2.5ml (½ tsp) salt110g (4oz) unsalted butter, cold (frozen is better)2 (2) egg yolks2.5ml (½ tsp) almond extract (optional)15-30ml (1-2 Tbsp) cold water
Sift together flour, sugar and salt. Grate butter into the flour mixture, using the large hole-side of a box grater. Using your finger tips only, and working very quickly, rub the fat into the flour until the mixture resembles bread crumbs. Set aside.
Lightly beat the egg yolks with the almond extract (if using) and quickly mix into the flour mixture. Keep mixing while dribbling in the water, only adding enough to form a cohesive and slightly sticky dough.
Form the dough into a disc, wrap in cling and refrigerate for at least 30 minutes
Jasmine’s notes:• I make this using vanilla salt and vanilla sugar.• If you wish, you can substitute the seeds of one vanilla bean, one teaspoon of vanilla paste or one teaspoon of vanilla extract for the almond extract
Frangipane
Prep time: 10-15 minutesEquipment needed: bowls, hand mixer, rubber spatula
125g (4.5oz) unsalted butter, softened125g (4.5oz) icing sugar3 (3) eggs2.5ml (½ tsp) almond extract125g (4.5oz) ground almonds30g (1oz) all purpose flour
Cream butter and sugar together for about a minute or until the mixture is primrose in colour and very fluffy. Scrape down the side of the bowl and add the eggs, one at a time, beating well after each addition. The batter may appear to curdle. In the words of Douglas Adams: Don’t panic. Really. It’ll be fine. After all three are in, pour in the almond extract and mix for about another 30 seconds and scrape down the sides again. With the beaters on, spoon in the ground nuts and the flour. Mix well. The mixture will be soft, keep its slightly curdled look (mostly from the almonds) and retain its pallid yellow colour.
Annemarie’s notes:• Add another five minutes or more if you're grinding your own almonds or if you're mixing by hand (Heaven help you).
Makes one 23cm (9” tart)Prep time: less than 10 minutes (plus time for the individual elements)Resting time: 15 minutesBaking time: 30 minutesEquipment needed: 23cm (9”) tart pan or pie tin (preferably with ridged edges), rolling pin
One quantity sweet shortcrust pastry (recipe follows)Bench flour250ml (1cup (8 US fl. oz)) jam or curd, warmed for spreadabilityOne quantity frangipane (recipe follows)One handful blanched, flaked almonds
Assembling the tartPlace the chilled dough disc on a lightly floured surface. If it's overly cold, you will need to let it become acclimatised for about 15 minutes before you roll it out. Flour the rolling pin and roll the pastry to 5mm (1/4”) thickness, by rolling in one direction only (start from the centre and roll away from you), and turning the disc a quarter turn after each roll. When the pastry is to the desired size and thickness, transfer it to the tart pan, press in and trim the excess dough. Patch any holes, fissures or tears with trimmed bits. Chill in the freezer for 15 minutes.
Preheat oven to 200C/400F.
Remove shell from freezer, spread as even a layer as you can of jam onto the pastry base. Top with frangipane, spreading to cover the entire surface of the tart. Smooth the top and pop into the oven for 30 minutes. Five minutes before the tart is done, the top will be poofy and brownish. Remove from oven and strew flaked almonds on top and return to the heat for the last five minutes of baking.
The finished tart will have a golden crust and the frangipane will be tanned, poofy and a bit spongy-looking. Remove from the oven and cool on the counter. Serve warm, with crème fraîche, whipped cream or custard sauce if you wish.
When you slice into the tart, the almond paste will be firm, but slightly squidgy and the crust should be crisp but not tough.
Jasmine’s notes:• If you cannot have nuts, you can try substituting Victoria sponge for the frangipane. It's a pretty popular popular cake, so you shouldn't have any troubles finding one in one of your cookbooks or through a Google search. That said, our dear Natalie at Gluten a Go Go has sourced some recipes and linked to them in the related alt.db thread.• You can use whichever jam you wish, but if you choose something with a lot of seeds, such as raspberry or blackberry, you should sieve them out.• The jam quantity can be anywhere from 60ml (1/4 cup) to 250ml (1cup), depending upon how “damp” and strongly flavoured your preserves are. I made it with the lesser quantity of home made strawberry jam, while Annemarie made it with the greater quantity of cherry jam; we both had fabulous results. If in doubt, just split the difference and spread 150ml (2/3cup) on the crust.Annemarie’s notes:• The excess shortcrust can be rolled out and cut into cookie-shapes (heck, it’s pretty darned close to a shortbread dough).
Sweet shortcrust pastry
Prep time: 15-20 minutesResting time: 30 minutes (minimum)Equipment needed: bowls, box grater, cling film
225g (8oz) all purpose flour30g (1oz) sugar2.5ml (½ tsp) salt110g (4oz) unsalted butter, cold (frozen is better)2 (2) egg yolks2.5ml (½ tsp) almond extract (optional)15-30ml (1-2 Tbsp) cold water
Sift together flour, sugar and salt. Grate butter into the flour mixture, using the large hole-side of a box grater. Using your finger tips only, and working very quickly, rub the fat into the flour until the mixture resembles bread crumbs. Set aside.
Lightly beat the egg yolks with the almond extract (if using) and quickly mix into the flour mixture. Keep mixing while dribbling in the water, only adding enough to form a cohesive and slightly sticky dough.
Form the dough into a disc, wrap in cling and refrigerate for at least 30 minutes
Jasmine’s notes:• I make this using vanilla salt and vanilla sugar.• If you wish, you can substitute the seeds of one vanilla bean, one teaspoon of vanilla paste or one teaspoon of vanilla extract for the almond extract
Frangipane
Prep time: 10-15 minutesEquipment needed: bowls, hand mixer, rubber spatula
125g (4.5oz) unsalted butter, softened125g (4.5oz) icing sugar3 (3) eggs2.5ml (½ tsp) almond extract125g (4.5oz) ground almonds30g (1oz) all purpose flour
Cream butter and sugar together for about a minute or until the mixture is primrose in colour and very fluffy. Scrape down the side of the bowl and add the eggs, one at a time, beating well after each addition. The batter may appear to curdle. In the words of Douglas Adams: Don’t panic. Really. It’ll be fine. After all three are in, pour in the almond extract and mix for about another 30 seconds and scrape down the sides again. With the beaters on, spoon in the ground nuts and the flour. Mix well. The mixture will be soft, keep its slightly curdled look (mostly from the almonds) and retain its pallid yellow colour.
Annemarie’s notes:• Add another five minutes or more if you're grinding your own almonds or if you're mixing by hand (Heaven help you).
Here you are mine
It turned out nice and easy.... very tasty, but I could not stop feeling guilty because of the amounts of butter in it, no problem once in a month not a big deal...;))))I made a white velvet cake with the egg whites I should not throw it anyway...I also had some of the dough's leftover so i made another tart . blueberry tart but did not taste it yet, I kept it in the freezer for another week !I did the same with the white velvet cake :)))Talking about our star dish, the bakewell tart, I struggled to get skinless almonds, i did not find so I took off its skin and grinded it.
I used a home made apricot jam, I prepared it last week ,our markets are full of good apricots.
I mixed with it some apples to enrich my jam with pectin without using artificial products.
we really enjoyed this month's challenge.
Thanks Jasmine, thanks Annemarie !!
Looking for the next month's challenge too !!
Love from my heart to all my DB's fellows hearts !!


 Try it , it is really yummy .
 it is something like pie, nobody can make it perfectly except some bakers who are really specialized in making it, just for making "fettir", it is like a pie and the original kind of it is plain and we use to eat it with honey, mollasses or a kind of cheese called "mesh",it is a kind of cheese prepared by marinating it for a long period .


 I made another batch of dough and made a savoury strudel, I stuffed it with a very middle eastern dish wich is "Shawerma" and "middle eastern rice flavored with cardamom and cinnamon" .


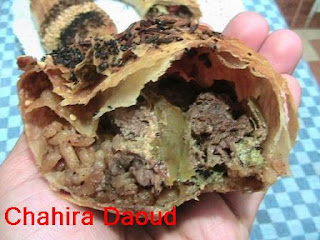 I had some dough so, I filled it with rasberry puree, and it was nice too !!
 this is my photo when I was 3 years old ! I did not know at this time that I will be a daring baker :)))
 My kids photo too was a part in this wonderful strudel's party..
 Here you are some of the first cheese cake pics.

 Second kind was a cheesecake with threee layers, first a vanilla one, the second is dark chocolate and the third was a cafe au lait, I topped it with a caramel chocolate ganache and butter scotch sauce and Macadamia nuts praline. Here you are some of the pics, it was really yummy !!


 Third one was a plain one flavored with vanilla & one TBS of lime juice, but I topped it with a coconut cream and fruits " loquat, nectarine, banana, strawberry" and I served it with a strawberry coulis and some shredded coconut.


 The recipe was excellent, here you are and sure it is now my favorite.


 And of course I bake my favorite kind of sweet bread, it looks like Challah or this kind of greek easter bread "braid shaped".


